

In the world of software engineering, there are two words that resonate in the ears of every rookie developer and that is Git & Github. So what exactly is Git?
Well, the technical way of explaining Git is it's a version control system used to manage large projects. And coming to Github it's a web-based platform for developers to host their Git repositories. We will touch the simple explanation soon.
(Get Set Go !)
To understand the way good developers use Git/Github follow along :)
(Note: Ensure that you have installed the Git tool on your PC/Mac to correlate better.)
I would be explaining the whole concept with a simple story.
Consider building up a simple dinosaur game similar to what we play on Chrome when we are offline.

When you start gitbash in the directory where you are working follow these commands in the beginning to configure your info :
git config --global user.name "<your user name>"
git config --global user.email "<your user email>"
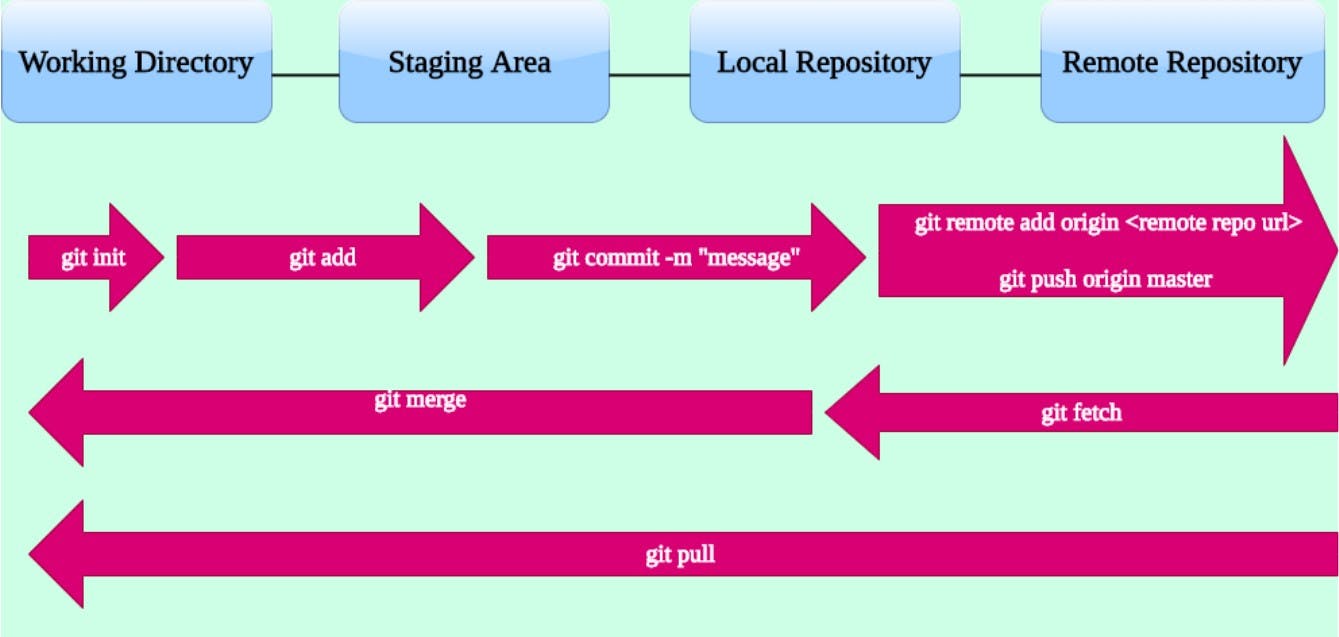
Now starts our official meeting with Git!. Before you start building your project it is important to initialize an empty Git repository in your directory using gitbash with the command:
git init
With this, an empty .git file would be created in your directory. A repository is like a storage space where you build your projects. In other words, consider a basket of fruits. Here fruits would be the components of your project and the basket would be your repository.

We have activated Git in our directory & now we will create files for our project. Say, we created a python file to build our game & started working...
Fast forward 2hrs....
By now let's say that you built a few components of the game like a dinosaur, clouds, trees as obstacles in the path of the dinosaur.
Now just consider a case where you accidentally deleted the files in your project or say someone added an unnecessary piece of code in your project. Now to revert back you may have to unnecessarily engage yourself to either create those files again or debug your code.
To avoid such a scenario it is important that you create a checkpoint after you complete certain parts of your project. In other words, you create a saved state of your project such that when you make any unnecessary changes & wish to jump back to this state, you can do that with Git. Follow the command:
git add <filename.extension>
With this command, your files enter what we call the staging area. It's like telling Git that you are going to save the current states of the files.
git commit -m "<message>"
With this, you command Git to save this state(current state) of the project in your history so that if I make any unnecessary changes and I want to jump back then it would be possible.
Now you can type this command to ensure that you have successfully committed the files:
git status
It is a good practice to use the
git status
command after every commit you make.
So now you have successfully created a checkpoint of your project.
Remember, every commit you make has a unique commit id which can be used to visit back that state.
Coming back to our game, now that you have saved a state you proceed further building up other components of your game.
Fast forward 2hrs....
Now let's say you have successfully made your dinosaur to run on the path after coding for two more hours. You now decide to add some colors to your game like as shown.

But say you are not sure if adding colors in the game would do any better to your project. In such a case you would want to have both the versions of your game so that you can compare them in an instant.
In such cases, it is not wise to copy the entire code, create a new project with small alterations, and test the upgrade. Rather you can use the concept of branches in Git.
Now, what is a branch in Git?
Imagine a river, your project is the main river flowing as you keep on building. In terms of Git, this main river would be called the master branch.
Now say that your river bifurcates into another parallel stream of water or it forms a distributary. In terms of Git, it's like having a copy of your project which is not in the main branch. Here you can make any changes and your main branch remains intact. This would be called a subsidiary branch of your master branch. There can be many branches from your master branch that could be used for testing new features.
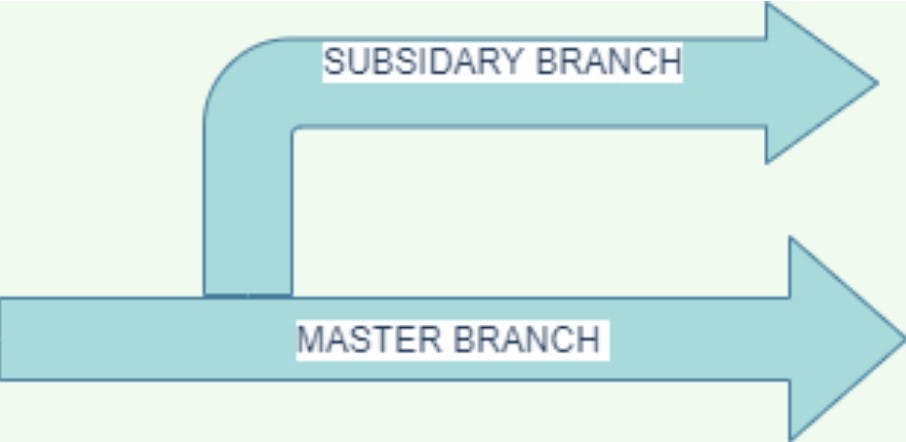
Now later the bifurcated streams of the river again merge into one later. In terms of Git, it's like merging the changes which you made in your subsidiary branch to the master branch.
Now to correlate this with our project. We are unsure about the color improvement, hence it's best to create a branch where we can do all the testing and commit our changes in this branch. If we are satisfied we can later merge it into our master branch. To create a separate branch:
git branch <name of branch>
Now to enter into the branch:
git checkout <branchname>
You can now do any changes or testing with your new features here. If you are happy with the results you are now ready to merge it with your master branch.
To merge your current branch with the master branch you must first switch back to the master branch using the same command:
git checkout master
Now you are ready to merge the branch using the command:
git merge <branch name>
Remember that there might be times where you might get some merge conflicts. In this case, do look into those parts of code.
With this knowledge, we have successfully added colors in our game :)
Now say that you have multiple commits and now you want to check an old commit. You would need the commit id for your old commit and for that you can type the command :
git log
This would provide you with a list of all the commits you have made in your project. You can use the keyword 'q' to quit from the list. Now after getting the commit id you can type this command :
git checkout <commit id>
You would notice Git telling you that you are in a detached state. You have jumped back to an old state, hence your code would be reverted back into the state that commit saved.
It just means that you have stepped back into history and are not flowing with the current state in the master branch which would be the head state. To return back to the head state you can simply type :
git checkout master
Now once you are done with your project it's time to save your repository on the internet. The repository on your PC would be called a local repository and the repository that you host on the internet would be called a remote repository.
There are many websites that let you host repositories like Github , BitBucket , Gitlab etc. The most popular among them is Github.
Now to proceed further ensure that you have created your Github account. Now create a remote repository through your Github account. The repo can be public or private. You may add the README file later.

To link your local repository with remote repository command:
git remote add origin <link - https://....>
To push your master branch :
git push origin master
Some developers push every commit they make on their local repo to remote repo via :
git push
This ensures that your local repo is in sync with the remote repo.
You can even push any subsidiary branch on Github. To do the same, first checkout into that branch and then type the command :
git push -u origin <branch>
Similarly, if you make any changes in your remote repo and want to incorporate those changes in your local repo then you can simply use :
git pull
which would directly fetch and merge the changes if there are no merge conflicts.
Note : (Some important commands that you may find useful)
git reset <filename.extension>= removes the files that were staged/addedgit diff
= compares the working tree to the staging area file(the file that is added by git add)git diff --staged
= compares the staging area file with the last commitgit rm <filename.extension>= to delete the file from the directorygit rm -r --cached <filename.extension>= to remove the file from the staging areagit log -p -2= to get the last 2 commits from the log,(it can be any number)git clone <repo url>= to clone someone's remote repository into your local PCgit checkout -b <branch name>= to checkout and create a new branch at the same time
Viola ! you have now successfully learned how to use Git. To gain much more familiarity start building projects use Git as much as you want :)